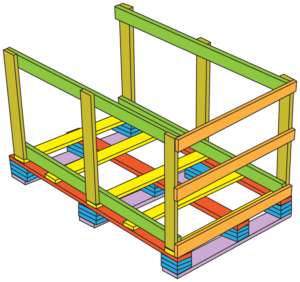
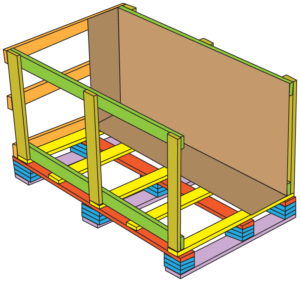
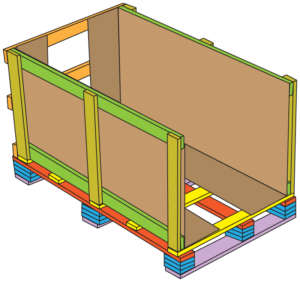
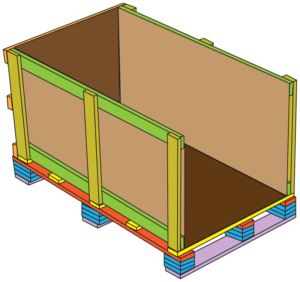
Behold the custom shipping crate — an often-overlooked cog in the fast-moving wheels of commerce. Well-designed custom crates can save you time and money — especially when you make them out of low cost recycled materials — so if you’re in the business of shipping large items safely and securely (as we are here at Formaspace), you might want to learn how to build your own customized, reusable crates when delivering goods to customers, or when dispatching trade show crates to exhibitions.
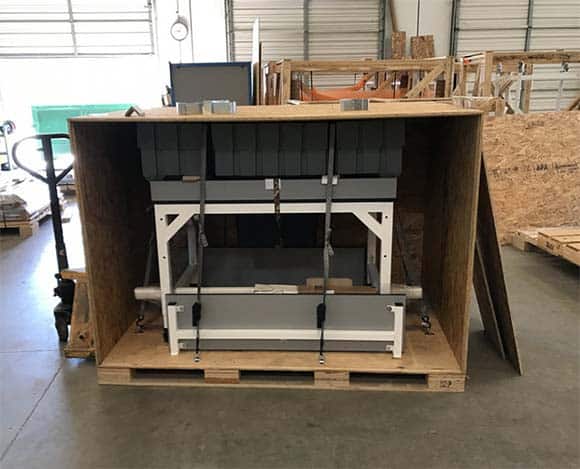
Here at our business furniture factory in Austin, Texas, Formaspace employee Albert Gilbert builds custom crates for each piece of furniture we ship to our customers. You might be surprised to know that Albert can build most of these custom crates in just five or ten minutes!
To be this productive, you have to be organized and have a plan. And, because we like to recycle as much left-over material as possible, we also employ a comprehensive program throughout our factory to collect every bit of manufacturing scrap material — ranging from plywood to melamine sheets, to hinges — even used nails get recycled! Often these recycled materials find their way into our shipping crates.
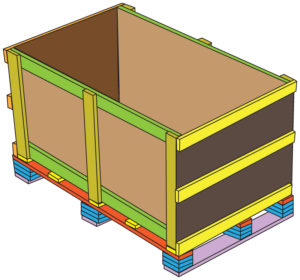
For furniture shipped short distances on a single vehicle, Albert typically builds an open style wood frame crate from scratch, starting with a pallet made from recycled lumber, plywood or melamine pieces. After the furniture is securely mounted on the pallet, Albert adds a protective frame made of wood around the furniture.

Furniture that is shipped LTL (aka “less that a truckload”) needs more protection, as it may be transferred a number of times between different trucks and warehouses on its way to its final destination. In these circumstances, Albert builds custom crates that are fully enclosed with plywood or OSB (oriented strand board) sheathing for added protection.
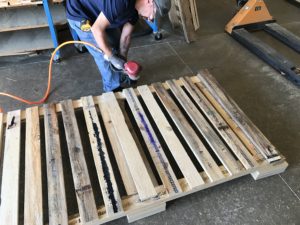
How to Build Your Own Reusable Crates or Trade Show Crates
What about building your own custom crates to use for shipping items to your own customers or for transporting items to and from a trade show? How do you go about it? It turns out you can build custom, reusable crates and trade show crates quite easily, at very low cost — especially if you have access to some recycled lumber.
To illustrate how to build your own crate, let’s create a crate from scratch to ship an item that is 40” wide, 36” high and 62” long.
Our Custom Crate Design: Base Out Crate with Built-In Block Style Pallet
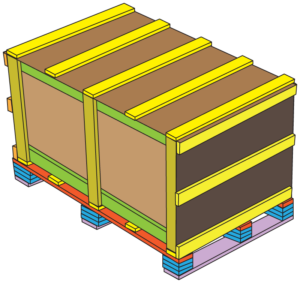
The style of crate we have in mind is called a ‘base out’ design, which simply means that the wood support pieces are mounted on the outside. The cargo itself will be enclosed in a sandwich of heavy duty cardboard and rigid foam, which is significantly lighter than solid plywood sheathing*. The crate will sit on a built-in pallet that uses blocks (rather than stringers with notches) to provide clearance for forklift blades to pass underneath. As a final step before shipment, we’ll use packaging film to seal up the entire crate to protect it from the weather.
(*A cardboard and foam combination is lighter than plywood or OSB sheathing (which means lower shipping costs)— but if you prefer a solid exterior, we’ll also show how to sheath the completed design with plywood or OSB during the final step if you need this added level of protection.)
Before You Start: Shipping Custom Crates Overseas May Require an ISPM Wood Pest Certification
This is also a good time to mention that if you are sending your crates overseas (even from the USA to Canada), you may be required to use wood that is stamped with an official ISPM logo* that certifies it’s been treated for pests. Natural wood products thicker than 6 mm will require certification, however, processed wood products, like OSB and plywood, do not.
(* The ISPM logo certifies that wood has met the International Standards for Phytosanitary Measures, an international accord to prevent transmission of invasive species (such as Formosan termites) in wood products. Fraudulent misuse of the ISPM logo is a serious offense and could be prosecuted as a felony.)
Building a Custom Wooden Shipping Crate, Read this Before You Start
Getting the Materials Together to Build a Custom, Reusable Crates
We’ll be using 1” x 4” wood lumber stock to build the structure of our reusable crate. Depending on what materials you have on hand, you can also use a band-saw to cut down 2” x 4” lumber to create the 1” x 4” stock.
In addition, we’ll want to set aside some heavy duty cardboard sheets and optional rigid foam panels or rolls of soft foam. Depending on the type of foam used, you may need some glue or staples to hold the foam and cardboard in place.
What Fasteners Should You Use to Build Custom, Reusable Crates?
To build a reusable crate, use heavy-duty screws with a screw gun to assemble the project. Don’t use inexpensive screws like those used for installing sheet rock — as these will corrode quickly when exposed to the elements — losing their strength in a surprisingly short period of time.
TIP: If you want to assemble the crate even faster, consider using a nail gun and Scrail brand fasteners. These fasteners combine the nail gun’s speed of assembly with the properties of a standard screw fastener (e.g. you can remove them easily).
How to Optimize the Dimensions of Your Custom Crate
Check with your shipper to see their price rates for different dimensions. You’ll find it’s generally much cheaper to pack your cargo in the smallest possible volume, as most shippers give you better rates for more “dense” crates.
This is the reason so many items are shipped “knocked down” into flat packs that you have to assemble upon delivery. If your cargo can be disassembled for shipping, take the time to figure out if it’s worth the extra cost in time and labor to do so in order to enjoy better shipping rates.
Be aware most LTL shippers won’t accept cargo for truck trailer shipment that’s longer than 96” inches (in any dimension) — long cargo items over 96” may have to be transported on special trailers, often exposed to the elements.
Building a custom shipping crate: Step by Step Guide:
Start Building the Crate, Beginning with the Sides
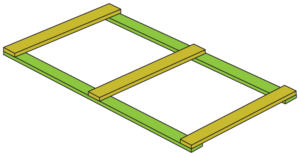
In this design, we’ll start out with 3 short vertical and 2 long horizontal pieces of 1” x 4” stock to fashion the sides.
The lumber needs to enclose the cargo as well as two layers of thick corrugated cardboard, and two layers of foam (roll or rigid) used to pad the interior walls surrounding the cargo.
In the following steps, we’ll assume our cargo is 40” wide, 36” high and 62” long, the corrugated cardboard is 1/4” thick, and our rigid foam is 1” thick.
In order for the horizontal lumber pieces to enclose the 62” length of cargo, we add the thickness of the foam and cardboard at each end, for a total length of 64 1/4”.
Use the same formula to calculate the dimensions of the vertical wood pieces — for cargo that is 36” high, you’ll need to cut pieces that are 38 1/4” long.
To assemble the first side, position two long, horizontal boards flat on the table.
Place three shorter vertical pieces on top, one on the far left, one in the center, and one on the far right. Adjust everything, so all outside edges are flush.
Using 1 1/2” screws, screw both ends of each of the three vertical pieces into the horizontal boards underneath.
This completes the frame for one side of the crate. Repeat to create a second frame for the opposite side of the crate.
Add Five Deckboards to Form the Top of the Pallet
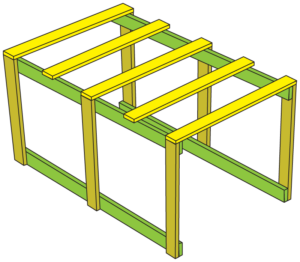
Stand up the two sides, so they are parallel, using a temporary support or assistance of a helper. Make sure the vertical wood pieces are facing outboard (away from the inside space).
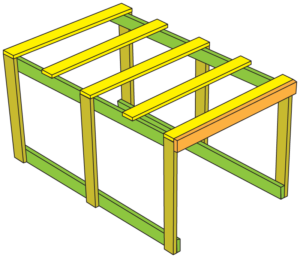
Our plan is to attach five deckboards across the top of the sides — it will look like a table when we are done with this step.
NOTE: As you’ll soon discover, we’re assembling the crate upside down at the moment. It’s easier this way because you can work in a standing position.
How long do these deckboards need to be? We’ll use the same formula we used before, except this time the deckboards need to extend an extra inch at either end in order to overlap the sides so that we can screw them together.
The resulting formula is 40” wide for the cargo + 2 1/4” for two cardboard foam sandwiches + 2” overlap for fasteners, for a grand total of 44 1/4”.*
Therefore, we need to cut 5 deckboards at 1” x 4” x 44 1/4”.
Position the five deckboards equidistantly across the top, with the first and last ones flush to the outboard edge. (Note: the 2nd and 4th boards will extend beyond the boards underneath, this is OK.)
Attach the five deckboard using screws at each end.
*NOTE: As the external width of our crate (44 1/4”) is nearly 48” (a common size), you might want to double check with your shipper to see if there is a cost saving to be had by up-sizing your crate’s external width to a full 48”. If you do, plan on including additional padding or packaging material to fill in the voids inside the crate.
Add a Horizontal Support to the “Closed” End of the Crate
Choose one end of the crate to be the permanently closed end.
(We will keep the other side open, for now, to access the inside and prepare the internal surfaces before loading the crate)
Measure the distance and cut a 1” x 4” board to fit flush to the top and the sides.
Attach this board at each end with screws.
Build Up the Pallet by Attaching Stringers to the Top Deckboards
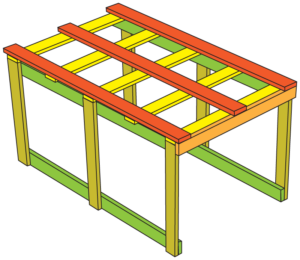
Next, we’ll cut three 1” x 4” stringers to mount on the top deckboards. These will be set parallel to the sides of the crate.
Place them equidistantly. Make sure the edges are flush. Screw each in board at the ends.
Add Pallet Blocks to Create Clearance for Fork Lift Blades
Forklift or pallet jack blades will need about 4” clearance to slip under the pallet, so to accommodate this, we’ll build up blocks out of 1” x 4” stock to attach to the stringers. (Once again, remember we are still working with the crate sitting upside down.)
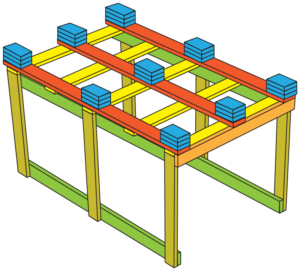
To spread the weight evenly, we want to build up blocks in nine locations.
Cut 1” x 4” stock into 6” long pieces. We’ll need 27 pieces to make three-layer thick blocks.
Screw the first set of blocks directly into the pallet in the nine locations shown in the diagram. Then attach the second layer directly on top of the first, then the third final layer on top of the second layer.
NOTE: If you alter this design to make a narrow crate, keep in mind that forklift and pallet jack blades (which are typically measure about 7” wide set on a 20” center) may be too wide to pass under a narrow pallet.
Add Skids to the Bottom of the Pallet
Skids make it easier to slide the pallet along the floor, and they also help make the pallet more rigid.
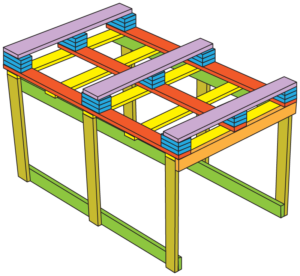
We’ll be creating three skids mounted perpendicular to the sides. The left skid will cover the left three blocks, the middle skid the middle three blocks, and the right skid the right three blocks.
Measure and cut the 1” x 4” stock, so each skid will be flush the outer dimension of the pallet and the blocks.
Take a moment to double check the clearance height for the forklift or pallet jack blades. The skids plus three layers of block material should provide about 4” clearance when the crate is flipped over, but if your stock is very undersized, you might need to step by to the previous step to add a fourth block layer before attaching on the skids.
Once everything checks out, screw the skids into the blocks.
Turn the Crate Over and Reinforce the Closed End
Flip the partially completed crate over, so it’s now sitting upright with the pallet side on the floor.
Next, we will finish reinforcing the closed end (the end with a cross member) by adding a second horizontal support halfway up and third one flush to the top. Cut the pieces, so they are flush with the outside edges of the sides and screw the ends into place.
Add a Heavy Cardboard Liner to the Inside Cargo Area
Now it’s time to line the interior of the crate with large pieces of corrugated cardboard.
Cut the cardboard approximately 12’ wider and 12’ longer than the inside wall dimensions. Remove a one-foot square section from the lower left corner and put it in the recycling bin.
Starting at the inside corner of the cutout, fold the cardboard to create two flaps that will extend onto the floor and the back interior wall.
Now position the cardboard against the interior wall. One flap should sit on the floor, the other flap against the back interior wall of the crate. Use a staple gun to tack the cardboard in place. (Trim any excess cardboard sticking out of the top.)
Repeat the process for the other side.
Now we’ll cut a third piece of cardboard to cover both the back interior wall and the floor. Fold and score into an L shape, then position it inside the crate to cover the back interior wall and the floor. Use a staple gun to tack the cardboard in place.
(If you can’t source cardboard this large, you can use multiple pieces but be sure to provide a generous overlap.)
Add Optional Custom Internal Supports
Depending on the cargo you are shipping, you may want to add some horizontal supports to help position your items within the crate. These can act as a divider to keep objects from moving around.
If your crate will be shipped with very heavy items stacked on top of it, you can also elect to add an additional horizontal support mounted between the two sides to improve the crate’s crush strength.
TIP: If you have fragile items to ship within the crate, consider purchasing a strong, inexpensive plastic cooler (used for camping and cookouts) to enclose these fragile items before securing the cooler inside the cargo area. The cooler will provide quite a bit of additional protection during transit.
Install Optional Soft or Rigid Foam Protection
In our design, we will add 1” rigid foam for added protection against impacts (due to cargo shifting when trucks hit potholes, forklifts bumping into or dropping crates, etc.). Alternatively, you can line the interior with a roll of soft foam instead.
Cut and fit the foam to cover the floor, two sides, and back interior wall. If needed, you can add some glue on the back side of the rigid foam to keep it in place; for soft foam, you can use staples hold to it in position.
Packing Your Cargo inside the Custom Crate
Before we build the front ‘door’ to the crate, now is a good time to prep the cargo for shipping. Depending on your cargo, it’s generally a good practice to wrap in cargo in shipping foam to avoid nicks and scratches, and then, wrap it again in packaging film to keep it dry.
Slide in the cargo into the open end of the crate. (You can also drop it into position vertically using a crane.)
If needed, fill the empty voids with packing materials. Consider using eco-friendly packing materials where possible.
Add Cardboard and Foam to Open End
After the cargo is loaded and secured, you’ll want to provide the same kind of protection for the door opening.
If you’re using foam, cut a piece to match the interior dimensions of the opening.
Next, cut a piece of cardboard for the open end. Because the cardboard will be mounted on the outside of the frame, you’ll need to cut it as wide as the outside dimensions of the crate. (If you need to use two pieces, be sure to overlap them generously.)
Insert the foam, then place the cardboard so that the bottom edge sits flush with the edge of the top pallet deckboard. Borrow a helper or use clamps to keep it in place for the next step.
If the cardboard is too tall, don’t worry, it can be trimmed later.
Close Off the Open End With Three Horizontal Wood Pieces
Once the cardboard and foam are in place, it’s time to seal off the door opening by attaching three horizontal wood pieces to cover the open end. These will match the opposite side of the crate.
Screw each of the wood pieces in place, piercing through the cardboard underneath.
If the cardboard extends beyond the top piece of wood, trim it off.
If you plan to construct reusable crates (and we hope you do!), follow these suggestions to make it easier to open and close the crate each time you use it:
- Use wood screws that are easy to remove.
- Circle the location of each screw to make it easier to locate.
- Add a label saying, “Open This End” to this side of the crate.
Create the Top of the Custom Crate
Cut a piece of foam to add to the top opening to protect your cargo in case of sudden negative G vertical acceleration, such as when a truck hits a bump in the road.
The foam will need to match the interior dimensions of the opening.
Cut a piece of cardboard to match the top’s outer dimensions and place it on top.
Next, you will attach 5 wood stringers across the top, which will be positioned equidistantly, perpendicular to the sides.
Screw them in place from the top, piercing through the cardboard to keep it in place.
Crate Shipping: Last steps
Add Optional Plywood Sheathing for Additional Strength and Protection
For more security, you could transform this shipping crate into a so-called “base-in” design by sheathing the outside with plywood or other solid material.
Keep in mind, however, that this approach could significantly increase the overall weight of your shipment, making it much more expensive to ship.
Use care to not overlap the sheathing in such a way that it blocks access to the end used to access the cargo. Also, be sure to mark the screw locations so that they can be found easily.
NOTE: Consider the environmental implications when choosing sheathing products. For example, even though products like Lauan plywood can be lighter than conventional plywood, tropical wood products might not be sourced from certified sustainable forests.
Wrap the Entire Custom Crate in Packaging Film
To keep your cargo dry during shipment, wrap the entire crate in packaging film before shipping.
Now you’re ready to ship! Whether you are shipping products directly to customers or you need to have some trade show crates on hand to ship your wares to and from exhibitions, we hope you’ve found our custom crate construction guide useful.
Trust the Furniture from Formaspace
If you like our environmentally-friendly crate designs, chances are you’ll really like our environmentally-friendly line of furniture for your office, manufacturing / shipping facilities, health science organization, government or educational institution.
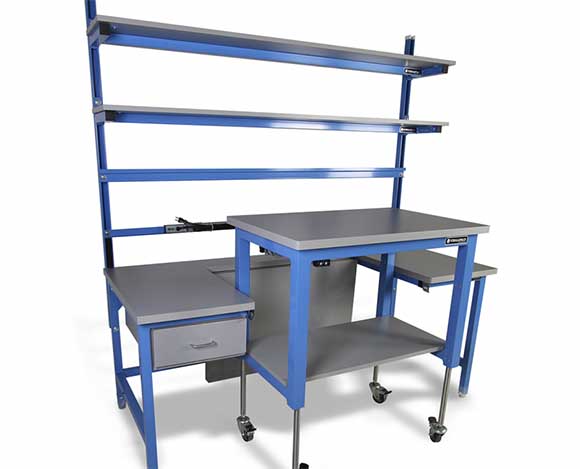
We only build top-quality furniture that is hand-crafted with longevity in mind: each piece of Formaspace furniture is guaranteed to last a full 12 years, even if you used it 24 hours around the clock. If you are looking for LEED credits, we also can provide you with custom furniture made with recyclable content, such our unique recovered powder coatings.
Want to learn more? Fill out the quick form below and a Formaspace Design Consultant will be in touch with you right away.


